Start your App
Sometimes we want to use our apps but we don’t have internet access (airplanes, basements and regions of the world where connection is very poor). With this offline component, you can take advantage of the OutSystems Platform rapid development to manage your data model, design your screens, and then just add a bit of JavaScript magic to add more advanced features or business logic.
Scaffold your app, add references to Offline and to HttpRequestHandler
Drag an entity to a web flow 2 times to create a List and Detail screen
Click Add/Remove References in your app.
Pick the Offline module in the producers section and select the OfflineTableRecords and OfflineForm web blocks along with all public actions.
Pick the HttpRequestHandler module in the producers section and select the GetEntryURL and SetStatusCode actions.
Pick the BinaryData module in the producers section and select the TextToBinaryData action.
Click OK so that the references are added to your module.
Change the pages to be static
The strategy to create an offline app is to separate the user interface from the data so that you can cache them separately in the mobile device's storage.
To make the pages static, so that they can be cached, but still be able to dynamically show data on them, we'll use a special sample record that will be replaced later using JavaScript.
Create a function to return a sample record
Create an action and name it GetSampleRecord
Add an Output Parameter called List, of Record List data type, with the Record Type you need.
Set the action's Function property to Yes
Drag a CreateSampleRecord action from the Offline eSpace references.
On the RecordListObject argument pass a ToObject(List)

Change the list screen
Delete the content of the screen's Preparation and add the GetSampleRecord action to the action flow.
Change the TableRecords Source Record List to the GetSampleRecord action created in the previous step
Delete the RefreshContactTable screen action
Delete the TableRecords_BottomNavigation container with the list pagination and list counters
Delete all List_SortColumn web blocks
Change Search and Reset buttons' destination to (Current Screen) and delete the arguments
Remove any formatting functions from expressions inside the TableRecords, such as Date_PrettyFormat, FormatDecimal and FormatCurrency.
If you want to use any of these features, you'll have to implement them via JavaScript.
Add an extended property offline to every element that contains a variable from your sample record and to all links not pointed at external URLs.
The extended property doesn't need a value, except for boolean variables and Image widgets. The value of the offline extended property for these should be the variable's source Entity.Attribute. e.g. "User.IsActive".
Change the details screen
Delete the content of the screen's Preparation and drag the GetSampleRecord action to it.
Delete the Save screen action.
Open the screen designer and remove the If around the screen's title. Replace it by something static, like "Edit Contact".
Select the web screen on the right-hand side widget tree. Replace the its Title property with something static, like "Edit Contact".
Change the Save button destination to (Current Screen) and fill in its Name property. Fill in the screen's inputs with null values - they won't be used.
Change the Form's Source Record to GetSampleRecord.List.Current
Add an extended property offline to every element that contains a variable from your sample record.
The extended property doesn't need a value, except for boolean variables. The value of the offline extended property for these should be the variable's source Entity.Attribute. e.g. "User.IsActive".

Make sure all input widgets follow the naming convention ENTITY_ATTRIBUTE.
When you use scaffolding to create your form the names are already generated according to this convention, but you need to keep this rule in mind if you had additional inputs manually.
Radio buttons should be named ENTITY_ATTRIBUTE_1, ENTITY_ATTRIBUTE_2, etc.
Any inputs that don't follow this naming convention will be ignored when you save the record!
Remove server-side redirects
Server side redirects (which are represented by Destination widgets poiting to screens) cause pages to be cached with the wrong name, so they need to be removed.
Go to the Preparation of the NoPermission screen, in your app's Common Web Flow. Replace the Destination widget's target with an External URL widget. Type GetEntryURL("Login", eSpaceName: "your espace name") in the External URL's input URL.
Publish the eSpace
Publish the app and test it. You'll notice that all entity attributes will be replaced by static strings, strange unique numbers and dates. These are there so they can be replaced by the data with JavaScript, as we're going to see next.
Create a service to get and save the records
To get the records to and from JavaScript we're going to create a web screen that will behave as a REST endpoint. The records will be serialized in JSON format. The records will be fetched by JavaScript when rendering the pages. If a user is online and saves a record, it will be saved to the database. If the user is offline, changes will be stored locally on the device and saved when the user is back online.
DISCLAIMER: In this HOWTO, we're assuming an optimistic scenario, where different users won't be modifying the same record. If that eventually happens, the last change will always prevail. If your offline scenario requires conflict detection and resolution, you should be able to implement it using server-side logic only. You won't need to chnage the Offline Apps component.
Getting the records
Create a new Web Flow Screen called REST_APIs
Add a Web Screen called REST_<YourEntity'sName> to the flow.
Open the screen designer and delete all content from the screen.
In the Preparation get the records from the database using an Aggregate
Use a ConvertRecordListToJson action, using ToObject() function with the results of the aggregate
Add a Download element with the result of the previous action, and set Save to Disk to No
Set the File Name to "records.js"
Change the Mime-Type to "application/json"
Saving the records
Add a text Input Parameter called RecordsJSON to the screen REST_<YourEntity'sName>, you created earlier.
Create a Local Variable of type List of Record, and add entities to the record until it matches the type output by the Aggregate
Drag an If right after the start to check if RecordsJSON isn't empty
When it isn't empty, use the ConvertJsonToRecordList action to fill in YourList with the contents of RecordsJSON. Use to ToObject(YourList) as this action's second input parameter.
Iterate the list and CreateOrUpdate the modified records
Handle errors on your RESTful services
The Offline Apps component expects the Login screen to be returned if an unauthenticated request is received. To ensure this behavior, you should add a Security Exception handler, with the Login screen as its target, to your REST_APIs Web Flow.
The REST approach requires that, when an error occurs, an appropriate HTTP Status code is returned. This can be done using the SetHttpStatus action, from HttpRequestHandler.
A simple way to ensure any errors return an error code is to add a REST_ERROR screen to your flow and make it the target of the "All Exceptions" error handler.
You'll need to place the SetHttpStatus in the REST_ERROR screen's Preparation and fill in the error code (usually 400, which means bad request).
It's also a good practice to replace the End widget with a Download widget (with the Save to Disk property set to no). The Download's file content should be the error's description, converted to binary using BinaryData's BinaryToText action.
The filename can be error.txt (the name is actually irrelevant) and the mime-type should be text/plain.
Publish and test the service
Publish the eSpace, and enter the URL of this page on a browser (e.g. http://yourserver/espacename/rest_contacts.aspx or .jsf), you should see the list of records serialized in JSON, with a sample and an empty record at the top.
Bind data to the pages
We'll now add some blocks to our screens to get the data from and to the REST endpoint. These will obtain the records from the service you just created and store them for offline use.
Drag the OfflineTableRecords web block on the List screen
You'll have to fill in the block's inputs:
TableRecordsId is the Id attribute of the TableRecords widget.
RestScreenURL is the URL of the service screen you just created on step 3. You should use the GetEntryURL function from HttpRequestHandler to generate that URL.
MasterEntityIdAttribute is the Id attribute of the entity.
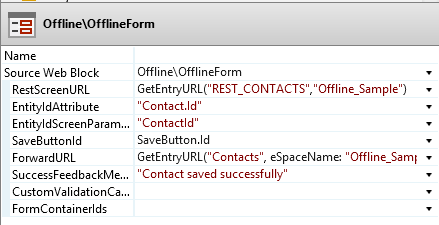
Drag the OfflineForm web block to the Detail screen
You'll have to fill in the block's inputs:
RestScreenURL is the URL of the service screen you created on step 3. As before, you should use the GetEntryURL function from HttpRequestHandler to generate that URL.
EntityIdAttribute is the name of the Id attribute of the entity you are editing on this screen.
EntityIdScreenParameter is the name of the Input Parameter on the Detail screen that will contain the Id of the record you are editing.
SaveButtonId is the Id of the button or link widget that will trigger the Save.
ForwardURL is the URL the user will be directed to after he presses the Save button.
SuccessFeedbackMessage is the message that will be displayed when a record is saved successfully. You shouldn't use Ifs here - they won't work.
Publish the app and check if there are no runtime errors
Publish the eSpace, open it in a web browser, and navigate through all the pages. The records should be there. If they aren't, then something might be wrong, and you might want to turn on your browser developer tools (F12) and make sure there are no JavaScript errors.
Test changing a record, and creating a new record. Everything should be working correctly.
Use jQuery to implement the search
Since we want everything to work offline, filters and any behaviors dependant on business logic will have to be implemented using JavaScript.
You can use the code below as a template for your filters, replacing the bolded code with your own application's entities and attributes.
$(document).on("finishedRender", initFilters);
function initFilters() {
execute our search function
$("input[value=Search]").attr("onclick","").click(function(event) {
event.preventDefault();
var searchText = $("input[id$=SearchInput]").val().toUpperCase();
var itemsToShow = REST_CONTACTS_records.sqlWhere(
"( UPPER(Contact.Name) LIKE '%" + searchText + "%' ) OR " +
"( UPPER(Contact.Email) LIKE '%" + searchText + "%' ) OR " +
"( UPPER(Contact.Phone) LIKE '%" + searchText + "%' ) AND " +
"(isDeleted = null)"
);
REST_CONTACTS_records.renderList(
null ,
itemsToShow /* records to render */,
"Contact.Id"
);
});
$("input[value=Reset]").attr("onclick","").click(function(event) {
event.preventDefault();
$("input[id$=SearchInput]").val("");
REST_CONTACTS_records.renderList(
null ,
null /* records to render; null means render all records */,
"Contact.Id"
);
});
}
Cache all static resources
The app pages are ready to go offline. The final step is to make sure each page registers the resources it needs on a
cache manifest file that will be used by the browser or the mobile device to know what files it needs to cache. For that you'll need to publish the app and navigate all URLs (be aware that default pages and entry points count as different URLs). You should see a progress bar at the top of your screen while this is happening.
You'll need to
navigate to all pages in order to create the application manifest - but this is a deployment task. After you do this,
your users will not need to navigate all the pages to have the app available offline.
When you publish your offline app to a new environment you can import the manifest from another environment, from each module's detail page, accessible from
this screen. This way, you only need to navigate through all screen in your development environment.
NOTE: the OfflineTableRecords, OfflineForm and OfflineListRecords include a script to:
Make the pages register all their static resources (images, js and css files) as files that can be cached;
Add an attribute to the outer html tag that indicates the browser should download all offline resources when a users navigate to this page.
Add Online / Offline CSS classes to the page's body that can be used to implement visual aids for the connection status.
These behaviors can also be provoked using the OfflineCache web block, in case you want to have a page without a list or form available offline.
Debugging and other scenarios
Check out the cache manifest file
View the source of a cached web page. You should see something like:
<!DOCTYPE html>
<html manifest="/Offline/GetCacheManifest.aspx?eSpaceName=MyContacts" xmlns="http://www.w3.org/1999/xhtml" >
  <head><title>
Copy that manifest url and paste it in the browser address bar (prefixing it with the domain name). You can now see the cache manifest that was generated as you navigated the latest version of the pages of your app for the first time:
CACHE MANIFEST

#VERSION 123

#URL
...
# CSS Files
...
This is the file that will tell browsers and mobile devices what to cache. It will change every time you publish a new version of your eSpace and navigate through the pages. The browser will only get a page from the server if this file has been modified since it read it last.
Debugging the app
Another option to test offline mode is to disconnect your laptop and try the app with a desktop browser like Google Chrome.
Google Chrome's development tools can help debugging the JavaScript. When something doesn't work as intended, checking the browser's console for errors or warnings shoud always be the first step. You can also use the Resources section to see how the data is saved. It should be appear in the IndexedDB, WebSQL or Local Storage, depending.
Chrome also has a chrome://appcache-internals special url that let's you see what's been saved.
You can also check cache manifest files in the
this page, to see what has been registered.
Handling more complex scenarios
Because the pages need to be static, it won't be possible to use screen actions, IF widgets, expressions that will change (such as formatting functions) and most of the RichWidgets. This means that, in order to add dynamic behaviors to your pages, you'll need to use jQuery (which is already included by the platform) and relly on OfflineApps'
JavaScript API functions.
Test your app
Use a tablet or smartphone and switch on Airplane Mode
Make sure you've followed 5.2 and navigated through all the pages of your app with at least one browser after publishing
Navigate using a tablet or smartphone to any page that is cached and then turn on Airplane Mode
Continue navigating the app, create change some records, and check if they are available on the list
Get back online, disable airplane mode, and check if the records are being synchronized to the server
You can now use your app anywhere!